The Peptide Lyophilization Process: A Lab Protocol Guide
August 15, 2026 · STEPHAN ZOHAR

The peptide lyophilization process converts an aqueous peptide solution into a stable, porous dry cake through three controlled stages: freezing, primary drying (sublimation), and secondary drying (desorption). Executed correctly, freeze-drying peptides arrests hydrolysis, oxidation, and aggregation pathways that degrade liquid preparations, yielding a product with residual moisture typically in a low range suitable for long-term stability and a validated shelf life well beyond what any liquid formulation can achieve. ICH Q1A-style stability testing, Tg’ (glass transition temperature of the maximally freeze-concentrated solution), collapse temperature (Tc), and Pirani/capacitance manometer comparison are the key reference points that govern every decision in the cycle.
From this guide, you will get:
- Clear parameter ranges for each stage (shelf temperatures, chamber pressures, typical durations)
- An excipient selection framework tied to Tg’ and Tc
- A stepwise, lab-ready protocol with monitoring endpoints
- A troubleshooting grid for collapse, meltback, high residual moisture, and oxidation
- Post-run QA and storage requirements, including residual moisture targets and Certificate of Analysis documentation
Key Takeaways
The peptide lyophilization process requires thermal characterization of Tg’ and Tc, excipient-driven formulation design, and instrument-confirmed endpoints to produce a stable, low-moisture cake suitable for validated long-term storage.
| Point | Details |
|---|---|
| Characterize thermally first | Determine Tg’ by DSC and Tc by FDM before setting any shelf temperature or pressure. |
| Keep product temp below Tc | Primary drying shelf temp must hold product at least 2–5 °C below Tc to prevent collapse. |
| Target residual moisture below 1–2% | Validate the moisture specification per product; measure every batch by Karl Fischer titration. |
| Confirm endpoints by instrument | Primary drying ends when Pirani and capacitance readings converge and thermocouples rise to shelf temp. |
| Document everything | Batch records, CoA purity data, and ICH Q1A stability plans are required for any validated lyophilization process. |
Table of Contents
- Why lyophilization is the right choice for peptide stability
- What equipment and materials you need before starting a run
- How excipients protect your peptide and control cake structure
- Freezing best practices: nucleation, annealing, and fill volume
- Step-by-step lyophilization protocol with parameter ranges
- Post-run handling, QA checks, and storage requirements
- Troubleshooting common lyophilization problems
- Evidence-based insights: annealing, continuous methods, and thermal characterization
- A researcher’s perspective on what the protocol actually demands
- Sources
Why lyophilization is the right choice for peptide stability
Lyophilized peptides are substantially more stable than liquid preparations; GMP-manufactured products with validated low residual moisture commonly receive assigned shelf lives of one to two years under refrigerated storage.
When lyophilization is the right call:
- The peptide is chemically labile in solution (susceptible to hydrolysis, oxidation, or aggregation)
- Long-term storage or ambient-temperature shipping is required and cold chain is impractical
- GMP packaging and distribution demand a validated, documented process
- The formulation cannot be stabilized adequately by refrigeration alone
Trade-offs to weigh before committing:
- Capital cost of validated freeze-drying equipment is significant
- Cycle development requires thermal characterization (DSC, freeze-drying microscopy)
- Process complexity increases with scale, and each formulation needs its own validated parameters
Pro Tip: Residual moisture targets are not arbitrary. The assigned shelf life under ICH Q1A-style stability testing is directly tied to the validated moisture specification. Measure every batch with Karl Fischer titration and treat the result as a critical quality attribute, not a formality.
What equipment and materials you need before starting a run
Preparing the right equipment before loading the freeze-dryer prevents the most common and costly mid-cycle failures. Sterile filtration through a 0.22 μm filter before filling, validated vial and closure selection, and pre-freeze practices such as controlled cooling or holding at −80 °C are minimum requirements, not optional refinements.
Minimum equipment:
- Validated laboratory freeze-dryer with shelf temperature control, vacuum pump, and condenser rated below the expected product temperature
- Pirani gauge and capacitance manometer (both required for endpoint detection)
- Pre-cooled shelf holders and vials rated for lyophilization
- Sterile 0.22 μm filters for final filtration before filling
Recommended additions:
- Product temperature thermocouples or wireless probes (at least 3–5 per run for representative monitoring)
- Controlled ice nucleation capability (pressurization, ice fog, or seeding system)
- Automated stoppering under inert gas (nitrogen)
- Karl Fischer titrator for residual moisture measurement
- Aluminum vial shields or holders for uniform heat transfer
Consumables checklist:
- Appropriate vial sizes (2 mL, 5 mL, or 10 mL depending on fill volume and peptide dose)
- Lyophilization-grade stoppers (silicone or bromobutyl, pre-slit for venting)
- Aluminum crimp seals
- Sterile single-use beakers or flasks for bulk solution
- Nitrogen or argon for inert backfill
Documentation and safety: PPE appropriate for the peptide’s hazard classification, batch records, labeling templates, and QA/QC sign-off checkpoints. If the product is intended for aseptic use, all filling steps require aseptic technique and environmental monitoring records. Review GMP-aligned process controls and documentation requirements before your first GMP-grade run.
How excipients protect your peptide and control cake structure
Excipient selection is the primary tool for protecting peptides during freezing and drying and for controlling cake structure, residual moisture, and reconstitution behavior. Formulation strategies typically combine non-reducing disaccharides such as sucrose or trehalose for amorphous stabilization with crystalline bulking agents such as mannitol; DSC and freeze-drying microscopy (FDM) determine Tg’ and Tc to set cycle limits.
Common excipients and their roles:
- Sucrose or trehalose (1–10% w/v): Amorphous cryo- and lyoprotectants. They form a glassy matrix around the peptide during drying, suppressing molecular mobility and degradation. Trehalose has a slightly higher Tg’ than sucrose, which can allow modestly higher shelf temperatures during primary drying.
- Mannitol in concentrations effective as a crystalline bulking agent: Crystalline bulking agent. Provides cake structure and improves reconstitution speed. Crystallizes during freezing or annealing, which raises the effective Tg’ of the remaining amorphous phase.
- Glycine at concentrations used for crystalline bulking: Another crystalline bulking agent, often used when mannitol crystallization is incomplete or when a different cake appearance is needed.
- L-histidine or phosphate buffers: L-histidine is preferred for many peptide formulations because it does not crystallize during freezing and maintains pH stability. Phosphate buffers can shift pH significantly on freezing and should be used cautiously.
- Polysorbate 20 or 80 at low levels as surfactants to reduce aggregation: Surfactants that protect peptide interfaces during freezing and agitation, reducing aggregation at air-water interfaces.
Excipient choices directly shift Tg’ and Tc. A higher Tg’ allows a higher shelf temperature during primary drying, which shortens cycle time. A lower Tg’ forces you to run colder and longer. Thermal characterization with DSC and FDM is not optional for a validated process; it is how you set the safe operating range.
Pro Tip: Never mix a crystallizing bulking agent (mannitol, glycine) with a non-crystallizing stabilizer (sucrose, trehalose) without running DSC and FDM on the combined system. Incomplete crystallization of mannitol in the presence of sucrose is a well-documented source of unexpected Tg’ depression, collapsed cakes, and failed stability batches. Characterize the mixture, not the individual components.
Freezing best practices: nucleation, annealing, and fill volume
The freezing profile determines ice crystal size and pore structure, which directly controls sublimation flux and primary drying time. A poorly designed freeze step creates heterogeneous vials with variable drying rates and inconsistent residual moisture.
- Degas the bulk solution if dissolved gases are present at levels that could cause foaming during vacuum application. Gentle stirring under vacuum for a few minutes is usually sufficient.
- Set fill volume to 10–30% of vial capacity as a general starting point. Deeper fills increase primary drying time non-linearly; shallower fills dry faster but may produce fragile cakes.
- Filter through a 0.22 μm sterile filter immediately before filling. Fill vials on pre-cooled shelves or holders to minimize temperature excursions before the freeze ramp begins.
- Apply a controlled cooling ramp of 0.5–1.0 °C/min from ambient to the target freeze temperature (typically −40 °C or below, confirmed by DSC data). Uncontrolled rapid freezing produces small, heterogeneous ice crystals that slow primary drying.
- Consider controlled nucleation via pressurization, ice fog introduction, or seeding to synchronize nucleation across all vials. This reduces vial-to-vial variability in ice crystal size and primary drying rate, a significant advantage at scale.
- Anneal when appropriate: Hold at a temperature above the eutectic or glass transition of the bulking agent (commonly −15 °C to −20 °C for mannitol systems) for 1–2 hours to promote Ostwald ripening and complete crystallization of crystalline excipients. Larger ice crystals after annealing improve sublimation flux.
- Recognize when annealing can cause harm. A 2026 study on continuous spin-freeze-drying found that annealing before drying produced compromised cake structure and longer drying times for a model peptide formulation. Radiative cooling improved temperature control but did not fully prevent these defects. Annealing benefits are formulation- and process-dependent; validate it for your specific system before adopting it as standard.
- Cool to final freeze temperature (typically −40 °C to −50 °C) and hold for at least 1–2 hours to ensure complete solidification before applying vacuum.
Pro Tip: Spin-freeze-drying and vial-based lyophilization behave differently under annealing. Do not transfer an annealing step validated on vials directly to a spin-freeze-drying process without independent characterization. The geometry and heat-transfer dynamics are different enough to produce opposite outcomes.
Step-by-step lyophilization protocol with parameter ranges
The cycle has three controlled stages: freezing, primary drying (sublimation), and secondary drying (desorption). Each stage has defined monitoring endpoints, and the transition between stages should be confirmed by instrument data, not by time alone.
Numbered protocol
- Pre-freeze preparation: Confirm shelf temperature calibration, Pirani and capacitance manometer function, and thermocouple placement (at least one probe per shelf quadrant, plus edge and center vials).
- Load vials onto pre-cooled shelves. Record load time, fill volume, and vial count in the batch record.
- Execute freeze ramp at 0.5–1.0 °C/min to target freeze temperature (typically −40 °C to −50 °C). Hold for 1–2 hours minimum.
- Anneal if required by formulation characterization: ramp to annealing temperature (e.g., −20 °C for mannitol systems), hold 1–2 hours, then ramp back to freeze temperature and hold.
- Apply vacuum to target primary drying chamber pressure (typically 50–200 mTorr). Do not apply vacuum before the product is fully frozen.
- Primary drying: Ramp shelf temperature slowly (0.1–0.3 °C/min) to the primary drying shelf setpoint (typically −20 °C to −30 °C for many peptide formulations, but always set at least 2–5 °C below Tc). Hold until endpoint is confirmed.
- Confirm primary drying endpoint: Pirani gauge reading converges with capacitance manometer reading (within 10–20% of each other), product thermocouples rise toward shelf temperature, and a pressure rise test shows minimal pressure increase over 30–60 seconds.
- Secondary drying: Ramp shelf temperature to 20–30 °C (product-dependent; some thermally sensitive peptides require lower setpoints). Maintain chamber pressure at or below primary drying pressure. Hold for 3–6 hours minimum, confirmed by stable Pirani/capacitance readings and thermocouple convergence.
- Backfill with inert gas (nitrogen) to atmospheric pressure or slightly below. Stopper vials under inert atmosphere if automated stoppering is available.
- Unload and crimp aluminum seals promptly. Transfer to cold storage or QC hold as per batch record.
Example parameter ranges for common peptide formulations
| Stage | Shelf temperature | Chamber pressure | Typical duration | Product temp target |
|---|---|---|---|---|
| Freezing | −40 °C to −50 °C | Ambient (no vacuum) | 2–4 hours | Below eutectic/Tg’ |
| Annealing (optional) | −15 °C to −20 °C | Ambient | 1–2 hours | Above Tg’ of bulking agent |
| Primary drying | −20 °C to −30 °C | 50–200 mTorr | 12 hours | ≥5 °C below Tc |
| Secondary drying | 20 °C to 30 °C | 50–200 mTorr | 3–6 hours | Below peptide degradation threshold |
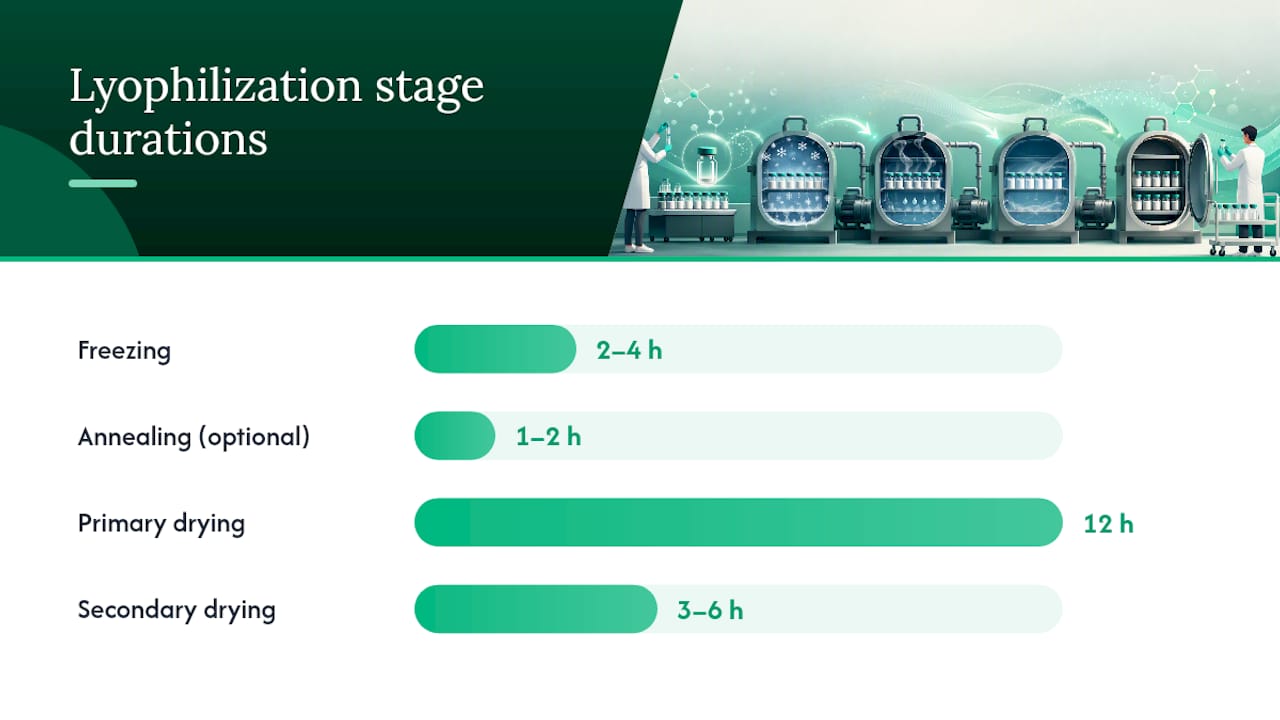
These parameter ranges reflect standard guidance for peptide lyophilization and must be confirmed by thermal characterization for each formulation.
Monitoring checklist
- Pirani vs. capacitance manometer: Pirani reads higher than capacitance during primary drying (water vapor elevates Pirani signal). Convergence signals end of sublimation.
- Product thermocouples: Temperature rises toward shelf setpoint as ice sublimation completes. Premature rise may indicate collapse or thermocouple placement error.
- Pressure rise test: Isolate the chamber for 30–60 seconds. A pressure rise above 50 mTorr/min during primary drying suggests significant residual ice.
- Visual cake check (through viewport): Cake should appear uniform, porous, and white. Translucent, shrunken, or collapsed areas indicate product temperature excursion above Tc.
Post-run handling, QA checks, and storage requirements
Careful stoppering, residual moisture measurement, and appropriate storage are the steps that determine whether a well-executed cycle translates into a stable, usable product. Practical storage and reconstitution guidance recommends choosing bacteriostatic or sterile water as appropriate, injecting diluent against the vial wall, and allowing gentle swirling rather than vigorous shaking to dissolve the cake.
Post-run QA checks:
- Cake appearance: Uniform, porous, white cake with no visible collapse, meltback, or discoloration. Reject vials with translucent or shrunken cakes.
- Vial weight checks: Gravimetric comparison against pre-fill weights to confirm fill volume consistency and detect any powder loss.
- Residual moisture (Karl Fischer titration): Target below 1% for most peptides; validate the specification per product. Residual moisture above 2–3% significantly accelerates degradation.
- Sterility or bioburden records: Required for aseptically filled products; document environmental monitoring data alongside batch records.
- HPLC and MS purity: Confirm purity against the Certificate of Analysis specification. Review third-party HPLC and MS testing protocols for QC documentation requirements.
Packaging and storage:
- Backfill with nitrogen before stoppering when oxidation-sensitive peptides are involved.
- Apply aluminum crimp seals immediately after stoppering.
- Use secondary packaging (moisture-barrier bags, desiccant pouches) to protect from ambient humidity during storage and shipping.
- Store at 2–8 °C for most lyophilized peptides unless validated data support ambient storage. Some peptides require −20 °C or below.
QA documentation: Batch records must capture all cycle parameters, thermocouple data, Pirani/capacitance logs, residual moisture results, and purity data. Stability test plans should follow ICH Q1A principles, with time points at 0, 3, 6, 12, 18, and 24 months minimum. Review vial handling and cold-chain-free storage guidance for practical packaging recommendations.
Pro Tip: When reconstituting, inject the diluent slowly against the vial wall rather than directly onto the cake. This prevents the cake from fragmenting into a suspension of fine particles that can be mistaken for aggregates. Swirl gently; never vortex. If the cake does not dissolve within 2–3 minutes, check your diluent compatibility and reconstitution volume against the validated specification.
Troubleshooting common lyophilization problems
Most lyophilization failures trace back to product temperature excursions above Tc, incorrect excipient selection, inappropriate pressure-heat balance, or vial-to-vial heat-transfer variability. The table below maps the most common problems to their probable causes and practical remedies.
| Problem | Probable cause | Practical remedy |
|---|---|---|
| Cake collapse | Product temp exceeded Tc during primary drying | Lower shelf temp, reduce chamber pressure, or reformulate to raise Tg’/Tc |
| Meltback | Eutectic melt or glass transition exceeded during freeze or early primary drying | Confirm complete freezing before vacuum; lower initial shelf temp |
| High residual moisture | Secondary drying too short or shelf temp too low | Extend secondary drying hold time; raise shelf temp if peptide is thermally stable |
| Sticky or glassy cake | Amorphous excipient content too high; incomplete crystallization of bulking agent | Add or increase crystalline bulking agent; add annealing step after thermal characterization |
| Excessive powder loss / fluffy cake | Sublimation rate too fast; vials not fully sealed during drying | Reduce shelf temp ramp rate; check stopper vent alignment; reduce fill volume |
| Oxidation or discoloration | Oxygen exposure during backfill or storage | Use nitrogen backfill; add antioxidant excipient (e.g., methionine) if compatible |
Red flags requiring full cycle review:
- Persistent high residual moisture across multiple vials despite extended secondary drying
- Visible meltback or collapse in more than 5% of vials in a batch
- Unexpected color change (yellowing, browning) not present in the pre-lyophilization solution
- Reconstitution failure or visible particulates after reconstitution with the validated diluent
Pro Tip: Never implement a process change on a full batch based on a single troubleshooting observation. Run a small-scale verification cycle (6–12 vials) with the proposed fix, confirm residual moisture and cake appearance, then document the change in the batch record before scaling. A fix that works at small scale but fails at full load is a common source of batch loss.
Evidence-based insights: annealing, continuous methods, and thermal characterization
The 2026 study on continuous spin-freeze-drying is a clear example: annealing before drying produced compromised cake structure and longer drying times for the model peptide formulation tested, and radiative cooling improved temperature control without fully preventing these defects. This finding does not mean annealing is harmful universally. It means the benefit cannot be assumed.
Key insight: Thermal characterization data (DSC-derived Tg’, FDM-derived Tc) are the foundation of every safe lyophilization cycle. A cycle designed without these measurements is not a validated process; it is an experiment with unknown risk. Always determine Tg’ and Tc for your specific formulation before setting shelf temperatures and chamber pressures.
Practical lab guidance drawn from current evidence:
- Run DSC on your formulated bulk solution (not the peptide alone) to determine Tg’. Run FDM to confirm Tc under realistic drying conditions.
- Introduce small-scale exploratory cycles (6–12 vials) before committing to full-batch parameters. Document all observations in the batch record.
- When vials at the edge of the shelf run warmer than center vials, use aluminum vial shields or heat-shielding inserts to reduce radiative heat load. This is particularly relevant in spin-freeze-drying geometries where heat transfer is less uniform.
- Do not generalize a result from one peptide formulation to another. Sequence, charge state, and excipient interactions all affect Tg’ and drying behavior independently.
- Certificates of Analysis from third-party HPLC and MS testing provide the purity baseline against which post-lyophilization stability samples are compared. Establish this baseline before the first cycle, not after.
Thermal characterization and control of processing temperatures are confirmed as essential by peer-reviewed literature; parameters like Tg’, Tc, and eutectic melting temperature guide safe product temperatures during primary drying and prevent collapse. The SOP framework for lyophilized peptide therapeutics reinforces that formulation development, sterile filtration, aseptic filling, and detailed batch record-keeping with QA verification are non-negotiable steps, not optional additions for GMP environments.
A researcher’s perspective on what the protocol actually demands
The protocol steps in this guide are correct, but the most common failure mode is not a missing step. It is treating lyophilization as a routine operation before the formulation is actually characterized. Researchers who load a freeze-dryer without DSC data, set shelf temperatures by analogy to a similar peptide, and call the result “validated” are not running a validated process. They are running a risk.
The Tg’ and Tc values for your specific formulation, with your specific excipient concentrations and your specific buffer, are the numbers that matter. Everything else in the protocol flows from those two values. If you do not have them, get them before you run the cycle.
Neolabpeptides supplies research-grade peptides in lyophilized form with Certificates of Analysis confirming HPLC and MS purity, so you can establish a verified purity baseline before your own processing steps. For protocol translation to a specific instrument or formulation support, consult the technical resources at Neolabpeptides.
Sources
The following sources provide primary protocol guidance, thermal characterization methods, and study data referenced throughout this guide:
- Buchi
- Effects of annealing on continuous spin-freeze-drying processes (Springer, 2026)
- Lyophilization Process for Peptides | Pepperpedia
- Lyophilized vs Non-Lyophilized Peptides: Which Is More Stable? | FormBlends
Recommended
This article summarizes published research for informational purposes. Products sold by Neo Lab Peptides are for laboratory research use only and are not intended for human or animal use.